


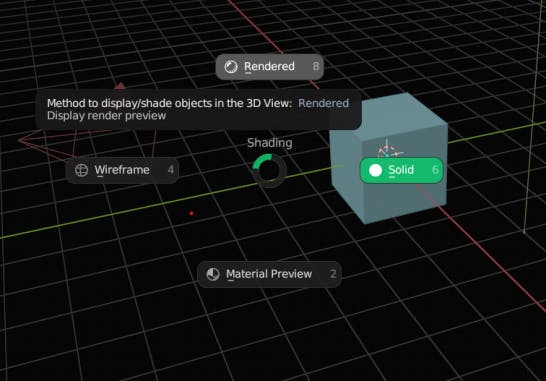
When we begin to work with Blender and start creating 3D models , we are provided with a 3D space called Viewport and 4 of the Viewport shading modes to work with , namely :
1. Wire frame - let’s us see the object edges in the form of wires.
2. Solid - displays the solid mesh ( or clay in simple terms ) of the model .
3. Material Preview - displays what material and texture is assigned to our object irrespective of the lighting of the object.
4.Rendered - what will the scene look like in the output stage .
These modes can be toggled by pressing Z on the keyboard.
And , the computer consumes a great amount of computing power depending on these view modes as well as while rendering the actual output.
System load : render process > rendered view > material preview > solid > wire frame
This can create all kinds of problems with the workflow, such as: laggy viewport, too much time taken to render, crashing the software, failing to load render preview, failing to load textures, slow working of the features, etc. While the performance obviously depends on your computer hardware, even having the adequate hardware can’t stop these problems if the settings aren’t properly optimized for your type of scene.
So in this article, I intend to share all these settings one by one that will make your scene the most optimized and faster.
ESSENTIALS
To use any 3D animation and modelling software a sufficiently capable graphics card is required so make sure that system has one with the appropriate graphics drivers installed.
Before even opening blender , it is recommended that you are using the latest LTS (Long Term Support) version of blender ( currently 3.6 LTS ) which are released once a year in blender’s update cycle as it provides much speed and reliability.
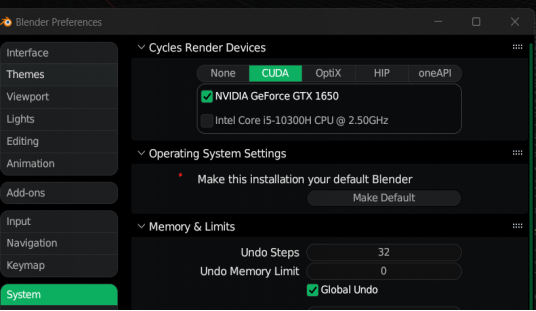
To make sure that your blender is making the use of the graphics card go to: edit --> preferences --> system --> on the right side of the window under the cycles render devices -->
1. Click on CUDA if you have a graphics card without ray tracing (RTX).
2. Click on OptiX if you have a graphics card with ray tracing (RTX).
3. Click on HIP if you have a AMD graphics card and try to compare the performance with OptiX and CUDA through task manager.
Only check the checkbox with your graphics card mentioned and not the processor for all three above options.
4. Click on the Metal option for Mac Apple M1 and similar chipsets .
Then , under the operating system settings click on make default.
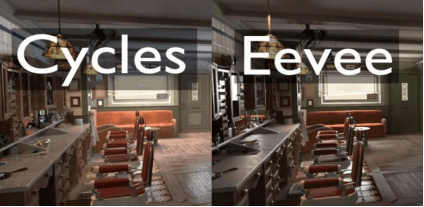
The next step is to determine which render engine to use, Eevee or Cycles ?
Cycles is a render engine which calculates the 3D data of light bounces , shadows and structures before displaying the output , which makes it give out very realistic results. Whereas, Eevee is a real-time render engine which is very fast as compared to Cycles and can provide results as good as cycles but certain objects just don’t work in Eevee if they’re present in your scene.
Basically, we choose cycles when there are a lot of complicated textures , realistic refraction, water effects and open large environments are required in the scene. It provides more bright and evenly lit environments.
While, Eevee on the other hand works best for closed environments with not very complex textures and no water and refraction elements. In these situations Eevee can render the output at least 12 times faster and we can view the output in the viewport render preview and interact with it in real time with no stutter whatsoever.
So we know that ideally we should try to create a scene that works realistically with Eevee but for the most part, with these variables in mind , the creator has to experiment and compare to choose whether to use Cycles or not as some scenes just do not work with Eevee and others can look almost photorealistic.

While making a scene, it’s important to keep in mind that what would be the render time taken by your PC . You choose such an angle of the scene which in your opinion would be the most resource heavy to render and then check the render time for one still frame from that particular angle.
Then, the total time taken for the whole animation is render time of all the frames in your animation. (approximately)
“After learning all these techniques your render time will be reduced to a minimum “
What are the correct settings for solid view ?
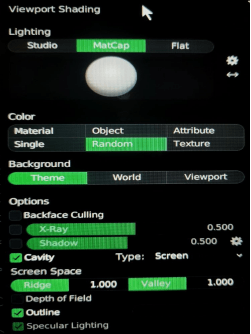
On the right of the Viewport shading mode selection --> hover on the dropdown arrow --> adjust the settings as shown in the above picture :
Select the MatCap in lighting
Select random for color
Turn off the shadow checkbox
Turn on the cavity checkbox
Turn on the outline checkbox
THE GOOD PRACTICE
Whenever we go on a hiking trip with our friends to a nearby mountain , carrying a bagpack and a number of resources at our disposal , we try to make sure that we only carry which is very essential and nothing extra to reduce load .
The same way here , it is a good practice to only set the complexity of the scene to the amount that we need the most .
Some of the basic terms which are going to be used below are explained in my last blog which you can check out to make sure that you understand :
candyman5757.hashnode.dev/important-terms-t..
However , if you seem to have prior knowledge about this , you can continue reading normally.
Output properties
Starting with the very first time saver which is the “resolution” of the output that you need .
So here is a list of all the resolutions for digital media that you'll probably ever need along with their recommended use cases.
1080p (1920 x 1080): Ideal for online streaming, YouTube videos, and general web content. Suitable for most HD TVs and monitors.
4K UHD (3840 x 2160): Offers higher resolution and detail for high-quality videos. Great for professional video production, high-end TVs, and cinematic experiences.
720p (1280 x 720):Used for streaming on platforms with bandwidth limitations. Suitable for lower-end devices and small screens.
1440p (2560 x 1440): Provides a higher resolution than 1080p, but not as demanding as 4K. Good for gaming content and videos that require a balance between quality and performance.
360p (640 x 360) or 480p (854 x 480):Used for lower quality or mobile-friendly videos to save on bandwidth. Suitable for quick sharing on social media or slower internet connections.
8K UHD (7680 x 4320):Extremely high resolution, providing exceptional detail. Still relatively new and used in very high-end video production and experimental settings.
Cinema 4K (4096 x 2160):Commonly used in professional film-making. Provides a wider aspect ratio than standard 4K UHD.
NOTE: Custom resolutions other than the ones mentioned can also be used depending on your unique use case for example banners , panorama or 360° videos.
When selecting a video resolution, consider the intended audience, viewing devices, available bandwidth, and the level of detail you want to convey. Always prioritize compatibility and the overall viewing experience.
To set the resolution in blender : look in the properties editor pane --> output tab --> resolution .
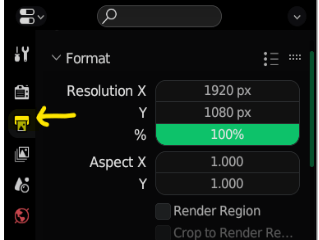
Here , you can also use or add more of the given presets by clicking the 3 dot menu on the right of format heading .
As we know that the render time depends on the number of frames , hence it also depends directly on the Frames per second (FPS) that you want for the output to be which can also be set in output properties .
24 fps: Standard for cinematic content and movies. Provides a natural and cinematic look.
30 fps: Common frame rate for TV broadcasts, online videos, and some video games. Offers a smoother look while still maintaining a cinematic feel.
60 fps:Common for video games, sports broadcasts, and action-oriented content. Provides a smoother and more fluid motion, especially important for fast-paced visuals.
120 fps and above: Increasingly used in high-refresh-rate monitors and gaming for an even smoother experience. Also employed for slow-motion shots in high-speed cameras.
15 fps and below: Used for artistic or experimental purposes, often creating a more jerky or stop-motion-like effect. Can also be used for animation or certain special effects.
It may seem a fairly simple concept but , on an important note , FPS of a video content is not only defined by it’s category but also depends on the type of artistic style that you want to aim .
Render properties
Eevee
As described above, Cycles gives output by properly calculating 3D visualization of light and textures , hence it gives us the power to manipulate a whole list of settings . Eevee on the other hand is quite easy to control .
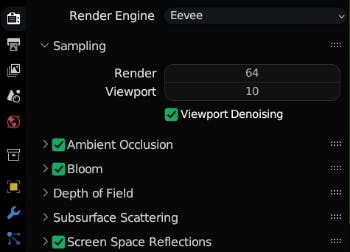
When working with Eevee , Render Sampling should be set to 64 samples and Viewport Sampling should be set to 10 for best performance without losing the quality . Along with this, be sure to check the check boxes of Ambient Occlusion , Bloom , Screen Space Reflection as shown in the image below to get the best looking results with Eevee.
Ambient Occlusion: Simulates shadows in corners and crevices, adding realism by depicting how ambient light is blocked by objects.
Bloom: Creates a glowing effect around bright light sources, enhancing brightness and lending scenes a dreamy atmosphere.
Screen Space Reflections: Simulates real-time reflections on surfaces by analyzing visible content, adding realism and detail to reflective surfaces.
__________________________________________________________________________
Cycles
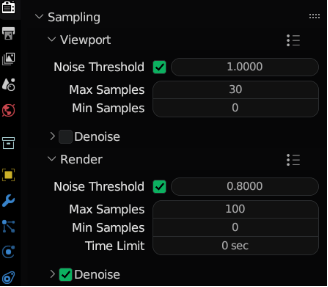
If our scene is based with Cycles in mind , then we have more control over different properties such as sampling , denoising and memory usage.
Under sampling properties:
Viewport : Noise Threshold : 1.000 , Max Samples : 30 , Turn off Denoising
Render : Noise Threshold : 0.8 , Max Samples : 100 , Turn On Denoising
Under light path properties:
set the total max bounces to 4 .
Turn off the reflection and refraction checkboxes under the caustics.
Turn on the Fast GI Approximation from the checkbox
Fast GI Approximation works in REPLACE mode by default where it reduces the total load by a significant margin but reduces a little brightness in the scene.
So whenever the Fast GI Approximation is turned on , you need to make sure that you have already put some extra lighting in the scene as you require .
This tool approximates and replaces the actual values of color and brightness with some perceived rounded down values in the scene to reduce the computation.
For example ,
when we do the operation --> Addition : 11 + 7
Actual answer --> 18
Perceived rounded down answer --> 10 + 5 = 15 , hence it accordingly reduced our actual answer by 3 for the sake of saving the extra computation done to fetch the actual values .
In ADD mode on the other hand , it adds the perceived value along with the actual value so it dramatically increases the brightness of the scene and takes even more time than usual to render , so it is not advised to use even if we want to make the scene a bit brighter .
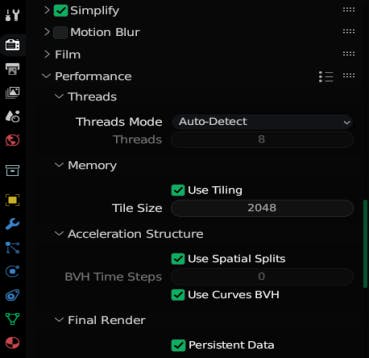
Turn on the Simplify checkbox
Under the performance properties
Turn on the “Use Tiling checkbox” under Memory , “Use Spatial Splits” and “Use Curves BVH” checkbox under Acceleration Structure and “Persistent Data” checkbox under Final Render .
Tiling is used to balance the increase in memory (RAM) storage that is used by spatial splits and BVH curves to decrease the render time , while persistent data is used to reduce the time when the same data is to be rendered again and again.
OTHER IMPORTANT MEASURES
These are other related tips that can also have drastic effects on the render time but it depends on the specific use case that whether it suits the artist’s requirements or not .
1. Copy the objects in the scene with ALT+D instead of SHIFT+D so that it creates an instance instead of making a duplicate . It does not allow the polygon density to increase in the scene so that we can increase the objects without increasing the complexity of the scene. Disadvantage : Changing one object in any way , changes all of the copies .
2. Using less resolution textures can reduce a lot of render time .
3. Baking the scene light , simulation and textures into the scene itself drastically decreases the render time because it won’t have to be calculated during the rendering .
4. Avoid the use of refraction and water caustic effects.
5. Fake the use of special effects instead of relying on reflection, simulations, geometry nodes and texture nodes .
6. Integrate other softwares into the workflow which are more specialized for a specific situation , instead of letting Blender do all the heavy lifting .
7. Using Motion blur where it is appropriate to use .
8. Using frame interpolation to increase the smoothness of a video instead of increasing the FPS.
9. Using the huge set of inbuilt and open source community Addons that are available for Blender.
These are some few important tips which will be discussed in even more detail in the future blogs and content which can be very helpful when you are creating any kind of digital content or a 3D map.
CONCLUSION
These were some very important adjustments according to their category which reduce the render time drastically and help the users to use the software smoothly and powerfully. All the settings shared were the minimum amount of load that can be integrated without losing any quality and they can be easily and gradually increased depending on the quality of the usage.
As mentioned above in a highlighted part , some of the terms are explained in the previous blog and you can check out to understand what is the meaning behind them here : BLOG 1
The quickest way for you to implement these settings would be to just download the blend file given below ( G drive link ) just save that file as startup file for blender : File --> defaults --> save startup file --> OK
Link: SETTINGS BLEND FILE
But, in-depth knowledge and experience is required to make changes in these settings when necessarily required .
Hope you like the information shared in this article and stay connected for more.
Connect on Linkedin : HERE
Connect on Instagram : HERE